
With so many fun ideas recently regarding charcuterie boards, I really needed some wonderful crackers to go with the vegan cheese blocks I found at Costco. Honestly, boxes of crackers that aren’t just white flour and refined oil cost an arm and a leg – and aren’t particularly flavorful. So, I popped online to find vegan whole wheat cracker recipes. There are many gluten-free options, but I didn’t find a lot of whole grain options.
The next step was to dig through my cookbook collection. I ended up in an old cookbook from 1974, that had belonged to my mother. It was plant-based before vegan was a well-known word. Some of those recipes have ingredients that I don’t recognize in today’s market! I knew I had made a cracker recipe from it before, but my hubby hadn’t been a fan. But tucked in between the pages were 2 pieces of scrap paper with scribbles delineating things I had tried years ago in order to make the crackers stand up taller in his eyes. I whipped up a batch and he loved them! And best yet, they pair nicely with the milder kinds of vegan cheese that are out there.
The original recipe called for 1 cup of wheat germ. I try to only eat organic grains to avoid glyphosate (to which I react poorly), however, an organic wheat germ was elusive. Instead, I substituted 3/4 c. coarsely ground flaxseed which I ground myself. If you can only find finely ground flaxseed, I would use 1/2 a cup, because it absorbs so much more liquid from the dough that it becomes difficult to roll out.
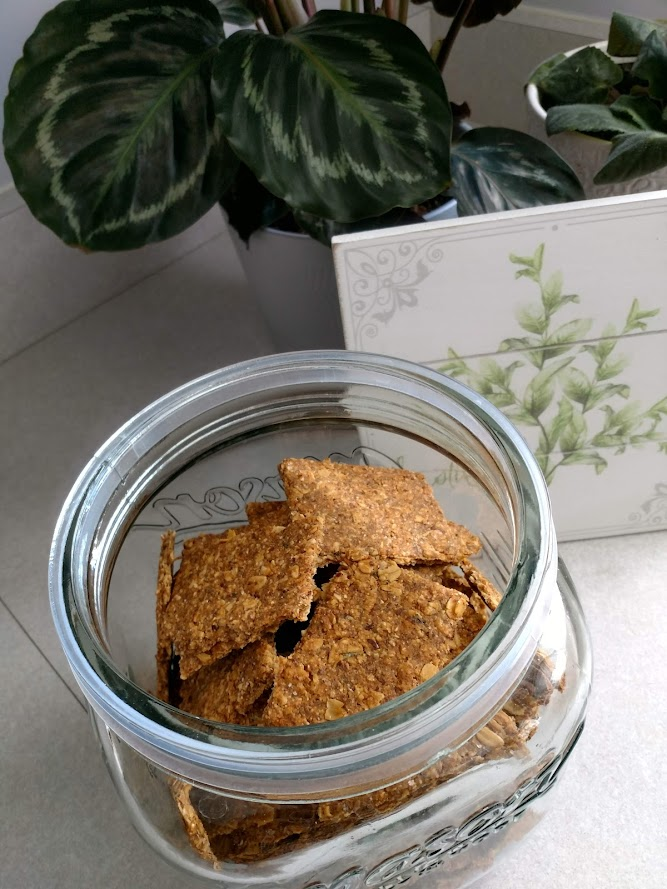
Hearty Whole Grain Sun-dried Tomato Crackers
- 3 c. rolled oats
- 2 c. whole wheat flour
- 1/2-3/4 c. coarsely ground flaxseed (or 1 c. wheat germ)
- 1-1/4 tsp. salt (plus extra for topping)
- 1/2 tsp. garlic powder
- 2 tsp. onion powder
- 2 tsp. dried basil
- 1 T. sweetener of choice (may be liquid)
- 2-4 T. sun-dried tomatoes packed in oil
- 1 c. water
- 2/3 c. extra virgin olive oil
Adjust your oven racks for using 2 cookie sheets at once, avoiding the very bottom and top slots to prevent burning. Preheat oven to 400ºF. Cut parchment paper to fit inside of a 10″ x 15″ cookie sheet with edges. (If you want thinner crackers, use a larger cookie sheet and larger parchment paper.)
Mix oats, flour, flaxseed (or wheat germ) in a large bowl. Whiz all remaining ingredients in a blender until the sun-dried tomatoes are tiny pieces, or liquified. Stir the wet ingredients thoroughly into the flour mixture with a fork, distributing the moisture evenly. Mix well and knead lightly until the dough doesn’t fall apart. If you need a little more moisture, just dampen your hands a bit at the sink and continue kneading. If the dough is too dry your cracker edges will be quite ragged and it is a challenge to roll out evenly.
Divide dough into 2 equal portions. Place one of your parchment paper pieces onto the counter. Use a rolling pin to roll one of the portions of dough out as evenly as you can to the edges of the paper, being careful to not be too thick in the center or thin on the edges. (Be patient as this can take a while with the oats. If you get rips in the dough, just press it back together. You can even pull off pieces from a thicker edge to press into the torn area and use the rolling pin to even it out again.) Sprinkle with salt and lightly press it into the crackers. Using a dull knife or a bench scraper, score the dough into your desired size of crackers. Once you have accomplished this, you can easily slide the parchment paper with the dough onto the cookie sheet. Set this pan aside and do the same with the other portion of dough.
Place cookie sheets in oven and immediately turn the temperature down to 325ºF. Set a timer for 25 minutes or until lightly browned. Swap placements of the cookie sheets to help evenly bake the tops and bottoms of the crackers. Turn the oven down to 200º and watch them closely until they are thoroughly baked. (If the crackers along the edge are browning before the center ones, you may need to remove those earlier.)
To cool crackers, slide the parchment paper directly onto cooling racks. Once completely cooled, store in an air-tight container.


