Hearty Whole Grain Sun-dried Tomato Crackers

With so many fun ideas recently regarding charcuterie boards, I really needed some wonderful crackers to go with the vegan cheese blocks I found at Costco. Honestly, boxes of crackers that aren’t just white flour and refined oil cost an arm and a leg – and aren’t particularly flavorful. So, I popped online to find vegan whole wheat cracker recipes. There are many gluten-free options, but I didn’t find a lot of whole grain options.

The next step was to dig through my cookbook collection. I ended up in an old cookbook from 1974, that had belonged to my mother. It was plant-based before vegan was a well-known word. Some of those recipes have ingredients that I don’t recognize in today’s market! I knew I had made a cracker recipe from it before, but my hubby hadn’t been a fan. But tucked in between the pages were 2 pieces of scrap paper with scribbles delineating things I had tried years ago in order to make the crackers stand up taller in his eyes. I whipped up a batch and he loved them! And best yet, they pair nicely with the milder kinds of vegan cheese that are out there.

The original recipe called for 1 cup of wheat germ. I try to only eat organic grains to avoid glyphosate (to which I react poorly), however, an organic wheat germ was elusive. Instead, I substituted 3/4 c. coarsely ground flaxseed which I ground myself. If you can only find finely ground flaxseed, I would use 1/2 a cup, because it absorbs so much more liquid from the dough that it becomes difficult to roll out.

Hearty Whole Grain Sun-dried Tomato Crackers

  • 3 c. rolled oats
  • 2 c. whole wheat flour
  • 1/2-3/4 c. coarsely ground flaxseed (or 1 c. wheat germ)
  • 1-1/4 tsp. salt (plus extra for topping)
  • 1/2 tsp. garlic powder
  • 2 tsp. onion powder
  • 2 tsp. dried basil
  • 1 T. sweetener of choice (may be liquid)
  • 2-4 T. sun-dried tomatoes packed in oil
  • 1 c. water
  • 2/3 c. extra virgin olive oil

Adjust your oven racks for using 2 cookie sheets at once, avoiding the very bottom and top slots to prevent burning. Preheat oven to 400ºF. Cut parchment paper to fit inside of a 10″ x 15″ cookie sheet with edges. (If you want thinner crackers, use a larger cookie sheet and larger parchment paper.)

Mix oats, flour, flaxseed (or wheat germ) in a large bowl. Whiz all remaining ingredients in a blender until the sun-dried tomatoes are tiny pieces, or liquified. Stir the wet ingredients thoroughly into the flour mixture with a fork, distributing the moisture evenly. Mix well and knead lightly until the dough doesn’t fall apart. If you need a little more moisture, just dampen your hands a bit at the sink and continue kneading. If the dough is too dry your cracker edges will be quite ragged and it is a challenge to roll out evenly.

Divide dough into 2 equal portions. Place one of your parchment paper pieces onto the counter. Use a rolling pin to roll one of the portions of dough out as evenly as you can to the edges of the paper, being careful to not be too thick in the center or thin on the edges. (Be patient as this can take a while with the oats. If you get rips in the dough, just press it back together. You can even pull off pieces from a thicker edge to press into the torn area and use the rolling pin to even it out again.) Sprinkle with salt and lightly press it into the crackers. Using a dull knife or a bench scraper, score the dough into your desired size of crackers. Once you have accomplished this, you can easily slide the parchment paper with the dough onto the cookie sheet. Set this pan aside and do the same with the other portion of dough.

Place cookie sheets in oven and immediately turn the temperature down to 325ºF. Set a timer for 25 minutes or until lightly browned. Swap placements of the cookie sheets to help evenly bake the tops and bottoms of the crackers. Turn the oven down to 200º and watch them closely until they are thoroughly baked. (If the crackers along the edge are browning before the center ones, you may need to remove those earlier.)

To cool crackers, slide the parchment paper directly onto cooling racks. Once completely cooled, store in an air-tight container.
Soy Yogurt

I’ve been on a journey for a while now, and it’s really not over yet.  Ever since I got married (32 years ago today!) and we decided to become vegetarian for our health’s sake, I’ve been reading books and learning everything I can about health.  With the internet, things got easier to find.  I love learning new things and I marvel at how well the Creator made us, giving us just the right food to help us live well.

Recently, I’ve been learning about how probiotics and cultured foods benefit us.  I won’t bore you with the details here.  Instead, I’d encourage you to dig into the research for yourself!  There are a lot of kinds of cultured foods out there, from sauerkraut to pickles (not the vinegar ones on the grocery shelves) to kimchee!  It’s easy to choose a favorite one to eat often.

I bought and tried cultured pickles.  They are STRONG.  I can eat them occasionally, but they aren’t something that I’m going to enjoy eating every day.  (And your best bet for getting a healthier flora in your gut is to partake of cultured foods at least daily.)

If you don’t make your own cultured foods at home, then they are pretty pricey in the markets.  I looked into making sauerkraut with wonderful jars that keep the smell from permeating your kitchen.  It looked like a really good way to make fermented foods myself, however, my favorite way of eating sauerkraut involves heating it…and that destroys the good bacteria.  Rats.  I still might make some of my own, but it won’t be my source of the healthy “bugs.”

If the sauerkraut was out, and the pickles weren’t favorites enough to eat daily (and my family wouldn’t even touch them, btw), then I needed to figure something else out.  As I googled “cultured foods” I found the answer.  Yogurt.  I love the stuff…at least most of the non-dairy ones I’ve had.  Unfortunately, it, too, is fairly expensive to buy ready made ~ and full of all kinds of stuff.  Carageenan (which I’ve recently learned isn’t that good for us), tons of sugar, and other tidbits that our bodies really don’t need.  So, back to the computer I went to see about making it myself.

I found tons of recipes, but most of them called for yogurt making machines, which I didn’t want to sink money into until I knew if this process was even going to work!  Then I found the best site yet ~ that I can’t find now to share with you, sorry! ~ one that told many different ways to ferment yogurt without the expensive investment.  This is the second best site that gave different ways to try, but doesn’t actually include the one I’m going to share with you here.

One of the challenges of making your own yogurt is beginning one with the proper culture.  Some recipes call for using probiotic capsules opened into it, but that didn’t feel very authentic to me.  Others said you needed specific starter kits from a health food store, but that they don’t work to re-use your own yogurt to make your next batch.  Instead, you’d need to buy a starter kit again!  What?  Not sustainable?  Next!  I chose the option of buying a non-dairy yogurt at the store and using it to culture my soy milk.  I chose a coconut yogurt that had 6 different bacteria listed on the label.  I figure if I’m going to repopulate my insides, I want the best amount I can get.  My first attempts were actually pretty poor, because I hadn’t found the best way to incubate it ~ I either didn’t keep it warm enough, or killed it with too warm of a spot, so I had to buy more packaged yogurt.  I again started with the 6-bacteria coconut version.  This time it worked!  Yay!  The next time, I used half of a tablespoon of my successful yogurt (with the 6 bacteria) AND half of a tablespoon from Almond Dream yogurt that contains 7 bacteria ~ a couple of which were different from the ones in my coconut yogurt!  I get the best bunch of probiotics going with so many different kinds.  And the more batches that I’ve made, the thicker the yogurt has gotten.

When you make yogurt like this, you must be patient.  (Not my strong suit.)  There are things that you must do to make it work correctly.  Believe me, because I tried the shortcuts that I thought would work.  Nope.  Stick to the “rules.”  For instance, the milk must be heated to 180° even though you have to cool it back down to 110°.  Why?  Because it changes the way the proteins line up with each other so that the bacteria can thicken it.  Otherwise, you get cultured milk….sorta.  (It was very disappointing, but I didn’t waste it.  We had it in our smoothies.)

Okay, here is the recipe.  If you have any questions about “why” something needs to be done, ask me.  I won’t bore everyone else with the details here.  🙂

Soy Yogurt

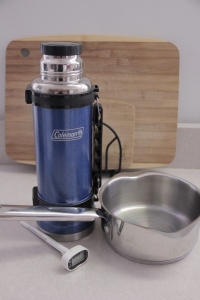
Equipment you will need:Soy yogurt equipment

  • a thermos that will hold at least 4 1/2 cups.  (I wish mine was large-mouthed to make clean up easier.  If yours is small-mouthed, get a bottle brush with which to wash it out.)
  • an instant-read digital thermometer, or one that can latch onto a small saucepan so that you get a constant reading.
  • a small 1-qt. saucepan (mine has a cute little spout on each side to make pouring into the thermos a snap!)

Ingredients:

  • 4 c. unsweetened soy milk with nothing other than soybeans and water (the other kinds sort of work, but this type thickens much better.  Trader Joe’s has it in an aseptic package, as does Eden, I believe.)
  • 1 T. evaporated cane juice crystals or sugar (I’ve read that maple syrup doesn’t work, but haven’t personally tried it, and honey is antibacterial, so it will kill off the bacteria you are trying to feed.  I don’t know about agave.)
  • 1 T. room temperature packaged non-dairy yogurt, or some from your last batch.  Even if you forget to save a little before you eat it all, you can scrape out the dregs from the serving/storage bowl and use those.  It doesn’t take too much, actually!

Take your yogurt culture out of the frig to allow it to come to room temperature while you continue with the recipe.  Heat the milk in the small saucepan to 180°.  If you have used unsweetened milk with no thickeners, you won’t need to stir it, even on high heat.  (I have a ceramic stove top that doesn’t get as hot as gas or some electric stoves, though.)  If you bought a soy milk with other things in it, you’ll need to keep the heat on medium so that it doesn’t stick, and you’ll need to stir it.  At first, you can walk away for a while and just check on the milk occasionally, but once it reaches about 145-150°, you’ll want to stay right there, because it rapidly gets to the target temp.  Remove from heat once it has reached 180°, stir in the sugar, and cool in the pan until it is between 105-110°.  (If you are in a hurry, you can set the pan on a wet towel, or in a sink with cold water in it.)  Once it’s cooled, stir a little of the milk into your yogurt starter until smooth, and then stir a little more to it.  Pour the starter culture mixture into the pan of milk and stir it well.  Pour it into the thermos and screw the lid on tight.  Set it aside for several hours.

When you think of it as you walk through the kitchen, uncap the thermos to allow any built-up pressure from the bacteria growing to escape.  (Sometimes I forget, though.  Then it does whoosh a bit when I open it at the end!)  Just don’t jiggle it around a lot as it’s fermenting, as it seems to dislike that.  After about 6 hours, check to see if it is thickening by opening it and gently tilting the thermos.  If it is thick, you are ready!  The longer you leave it, the stronger the flavor becomes ~ and to a certain extent, the thicker it gets.

Pour it into a glass storage container and cover.  If it isn’t as thick as you’d like, leave it to cool on the counter for an hour or two before refrigerating.  Once it is cold, it will thicken a little more.  Now you can stir in extra sweetener, mashed fruit, jam, or whatever you’d like to flavor it.  It works great as is in smoothies!

Honey Mustard Dipping Sauce

Here’s a quick, simple recipe for your veggie “chicken”-style faux meats, like Gardein filets or soy curls made into chicky strips.  Or use it for a salad dressing, if you dare!  It isn’t a low-fat sauce, but it’s nice for a special treat.  I even think plain pretzels dipped in it might be pretty tasty!

I didn’t capture a picture of it.  I’m sorry.  It was gobbled up too fast last night!

Honey Mustard Dipping Sauce

  • 1 part spicy brown mustard
  • 2 parts honey (perhaps another liquid sweetener would work as well, such as maple syrup or agave)
  • 3 parts Veganaise (mayo substitute)

Whisk all ingredients together and serve with faux chicken strips, chunks, etc., or use as a salad dressing or spread for a sandwich.

Caramel Dip for Apples

I love the fall.  The wonderful smell in the air (especially if you are near any bonfires or woodburning stoves), the brisk temperatures, and the fall colors!  Best of all, it’s finally cool enough to start baking again.  (Although, I still haven’t figured out exactly the best way to get passed the gluten-free issues with my favorite recipes.  Not impressed with most gluten-free options out there.)

One of my favorite tastes of fall has to be fresh apples…crisp, juicy ones that make your mouth water when you write about bite into them.  It’s even more of a treat ~ almost dessert, if you will ~ when you make this caramel dip to go with sliced apples.  Add some popcorn to the deal and I’m all set!  That’s a wonderful light meal, in my opinion.  🙂

If you want a thinner ice cream topping, just cut the cornstarch in half and omit the milk leaving just the 2 T. of water in which to mix it.

This is marvelous with popcorn, too.  It doesn’t harden up to make popcorn balls ~ and I’m too lazy to make them.  But you can drizzle it over the top of a bowl of popcorn and either be a fastidious person and use a spoon, or just dig in with your fingers, licking them as necessary.  😉

Caramel Dip for Apples

  • 1 1/2 c. non-dairy milk, plain or vanilla
  • 1 1/2 c. demerara, turbinado, or raw sugar, or Sucanat, or if you use plain evaporated cane juice crystals, just add a couple tablespoons of molasses.
  • 2/3 c. maple syrup (grade B is the best in this case)
  • 1/4 tsp. salt
  • 2 T. water
  • 2 T. extra non-dairy milk
  • 1/4 c. cornstarch (or arrowroot, but I like the results from cornstarch better)
  • 2 T. vegan margarine such as Earth Balance
  • 2-3 tsp. vanilla

Plan ahead and have a spoon next to the stove for later in the recipe, unless you are blessed to have your utensil drawer next to your cooktop, or you can plan on using the spoon with which you stir your cornstarch mixture.  In a 3 quart saucepan (trust me on the size!) whisk milk, sugar, syrup, and salt to combine.  Whisk occasionally while cooking over medium heat.  (WARNING:  Do not lose track of what you are doing, because if this begins to boil unattended, it will boil over and make a terrible mess!  And yes, this is experience speaking.)  In a measuring cup or small bowl, mix the cornstarch, water, and extra milk.  Just as the milk and sugar mixture begins to boil, pour the cornstarch mixture into it, whisking constantly.  Cook an addition 2-3 minutes, or until desired thickness.  Keep in mind that it will thicken as it cools if you used cornstarch; not so with arrowroot.  Since whisks aren’t particularly helpful to check on the thickness of things, use the spoon I mentioned earlier.  Remove from heat and whisk in the margarine and vanilla.  If it doesn’t seem thick enough at this point, you can put it back on the stove for a little bit longer.

Pour into a pretty glass or ceramic bowl.  Cover with plastic wrap touching the surface to keep a ‘skin’ from forming.  (Please try to use BPA-free plastic wrap.  According to Jillian Michaels, Saran is the only brand that has taken this protective step.)  Cool in refrigerator.

Serve drizzled over apple slices, or in small bowls for individual dipping.

Yields:  3 cups.

Magnesium Deficiency

This is a MUST see for every person on this planet.  Magnesium deficiency is causing health problems that are easily addressed!  Do you have high blood pressure, stress, depression, bone loss, muscle spasms and/or pain, and a host of other problems, then you will especially want to see this short video.  It may change your life.

Click here to watch video.

How can you fix this problem easily?  Increase your greens and seeds and take magnesium citrate.  Read the book The Magnesium Miracle to learn more.

Homemade Laundry Detergent

This is actually a “recipe” making the rounds in e-mail sharing.  I do not know the original author.  If you do, please, please tell me in the comments and I will give credit to them!  But this was too great of a recipe not to share with you.

When someone sent this to me, I was a tad bit skeptical and didn’t really look at it closely.  I figured it was just something silly making the rounds.  It looked to simple to actually work.  Then Aunt Kathy sent it to me with a glowing personal review.  Hmmm….maybe I should pay attention.  I looked at the cost projected for a batch and decided it was cheaper than a lot of things I waste money on, so why not try it?

I chose to use the Fels Naptha soap since that is what Aunt Kathy used and I wanted to make sure mine worked.  (I’ve since heard reports that any soap works well and will try that next time, because I’m pretty sure that most commercial soaps not from the health food section or store contain animal fats.)  I am not a fan of using my food grater for soap, so I slivered the soap with an old knife.  I didn’t really want to use any of my good pots in which I cook food, so I used the base of my double boiler (which is actually an old pan with it’s Silverstone coating peeling off.)

I bought a bucket and lid from Home Depot for less than $5 to store it.  I scoop it out using an old measuring cup.

When my old laundry detergent ran out, I nervously opened my new bucket full of homemade soap.  Would it work?  As I went through the piles of clothes, running them through the washer and drier, everything seemed to be coming out clean and fresh.  The big test still waited.  When hubby came home from work, I would need to wash his pile of work clothes along with the ones he was wearing….from roofing that week.  (For those of you who don’t know, roofing work clothes smell like tar and are grubbier than grubby with filthy knees from being on them and thighs because he wipes his hands there.)  How would they come out??  This was the acid test for me. Usually it takes 2-3 washings after hubby is finished with a roof for his pants to smell normal again.  That tar smell just sticks around.  Thankfully he doesn’t roof all of the time.

I always use extra soap when I wash this load.  I used the 2/3 c. for my extra-capacity machine, plus I scooped another 1/3 c. for good measure.  These were filthy and smelly.  When I pulled the clothes out of the washer I gingerly sniffed at them from afar.  Hmm…not bad.  I went in closer.  My mouth literally dropped open.  I could smell nothing but the clean smell of the soap!!  I examined the front of the jeans…and they were cleaner than I’d seen them in a long time (although work jeans are usually so stained that nothing EVER could make them truly “clean” looking again, but these were as good as I could expect.)  After they came out of the drier, I smushed them against my nose to smell them one more time.  I have the world’s most sensitive nose, according to hubby ~ who can smell next to nothing ~ and there was not any odor of tar to be smelled on them!!  I was amazed.

So, this recipe comes to you highly recommended.  It costs very little to make, except some of your time.  The 3 main ingredients can be found at Walmart just about right next to each other across the aisle from the Tide, Cheer, etc.  I believe my total cost for the 3 items was $10-12.  I have enough Fels Naptha to make 2 more batches and enough of the other 2 ingredients to make 10 or more batches!  My 5-gallon Home Depot bucket was about half full when I made the batch.  That is going to last me for a very long time.  Even if the half bucketful was only as much as 2 of my regular jugs of laundry detergent, just one batch costs half of what my Cheer normally does.  If I bought enough Fels Naptha to match how much of the other 2 ingredients I have, it would cost another $3.  I could then make 12 batches for $13-15.  If each batch makes a minimum of 2 jugs worth of the Cheer/Tide/etc., I would be saving at least $117.  (And I believe it’s more, because I think a batch would fill more than 2 of my empty jugs if I had a funnel to do so.)

Addendum:  A single recipe of this lasts my family of 4 (2 adult-sized teen boys included) for about 2 months.

Use this exactly as you would use your regular detergent.  If you add baking soda to your load normally, then do it with this.  If you use bleach or bleach alternative, then continue to use it with this.

Homemade Laundry Detergent

You will need a bucket or large soup pot that will hold about 3 gallons.

  •  1/3 bar Fels Naptha soap – grated (or other soap)
  • ½ Cup 20 Mule Team Borax
  • ½ Cup Washing Soda (NOT baking soda)

Place grated Fels Naptha (or your choice of soap) in sauce pan with 6 cups water.  Heat until soap is melted, stirring constantly.

Add Borax and Washing Soda, stir until they are dissolved. Remove from heat.

Place 4 Cups HOT water in bucket or pot.  Add dissolved mixture and stir well.   Add 1 Gallon plus 6 cups of water and stir well again.

Cover and let sit over night.  Mixture will be a semi-gel like substance.*  Soap will have a light fragrance and you may add a few drops of any essential oil you prefer.

Use about 1/2 c. per load.**  This is a low-, non-sudsing soap and can be used in front loading machines (the bubbles are NOT what cleans your clothes).

*Mine didn’t gel up much, although it did thicken a little.  Perhaps that’s because of our extremely hard water.                                                                                                            **I have a large capacity machine and use 2/3 c.

Hummus

Everybody has a favorite hummus recipe, right?  Well…sometimes the answer is ‘no.’  This post is for those poor deprived souls who don’t already have their own go-to recipe for hummus.

This is super easy and so much cheaper than buying a tub of it in the store ~ some of them are quite pricey.  (And have you checked out the ingredients lists on some of those?  Ick.  I don’t like canola oil or vinegar.  I want healthier choices.)

Hummus

  • 1 can garbanzo beans, rinsed and drained
  • 1 1/2-2 T. lemon juice
  • 2 T. tahini (Joyva is my favorite brand – for taste and ease of stirring)
  • 1-2 tsp. extra virgin olive oil
  • 1 clove fresh garlic (2-3 for garlic hummus)
  • 1/4-1/3 c. chopped onion
  • heaping 1/2 tsp. salt
  • 1/4-1/3 c. water (depending on how watery your onion is, and desired thickness)

Blend either in food processor or blender until very smooth.

Variations:  add in one or more of the following ~ roasted garlic, sun-dried tomatoes, basil, green onion, dillweed, spinach, etc.  Look at the flavors in the store and experiment with add-ins.  If you are adding in a slightly liquidy item, decrease your water.

French Onion Dip

My mom always used Lipton Onion Soup Mix to make French Onion Dip every New Year’s Eve and Super Bowl.  (You remember – with a carton of sour cream and a packet of the soup mix?)  Why she only made it 2 times a year is beyond me.  I loved that stuff!

Once I found out that Tofutti made soy sour cream, I figured as a vegan I could once again make this dip.  Alas, when looking at the ingredients list on the Lipton soup, I found something to which an offspring was allergic.  Rats.  So, I crossed it off my list for a while.

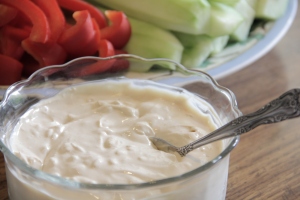
Eventually, I experimented and came up with this version of French Onion Dip.  You know, I love it just as much as my mom’s ~ and it’s healthier.  (Especially since I dip veggies into it instead of chips~usually!)

French Onion Dip

  • 1 container Tofutti soy sour cream
  • 1/16 tsp. garlic powder
  • 1/2 tsp. onion powder
  • 1 T. dried minced onion pieces
  • 1/2 tsp. salt (increase or decrease to taste)
  • 2 tsp. Marmite or Vegex (a brewer’s yeast extract) –  (increase to 1 T. for a stronger flavor)

Mix all ingredients together.  Taste and add extra salt, onion powder, and/or Marmite to taste.  Use as a dip for veggies, chips, crackers, etc., or as a sandwich spread instead of mayo.

General Tso’s Sauce

What do you do when you can’t find an inexpensive bottle or two of General Tso’s Sauce for your supper plans?  Well, either you go without, or spend the big bucks, right?  *BEEP*  Wrong answer.  ;D  You go to the website of your favorite brand of sauce and look at the ingredients list…and then use it to approximate amounts to create your own!  Or…at least…that’s what I did last night.  It was either that or use the veggies I had already purchased to make a very mundane stir fry instead.

My only fear came when I tasted the sauce.  MAN!!…was it salty!!!  But since I had never actually tasted the purchased sauce straight out of the bottle, I really didn’t have anything to go by.  My tofu had nothing flavoring it except the coconut oil in which I sauteed it and my veggies had no salt on them.  I took the risk.  I poured it over the tofu to marinate since it was finished first.  Once the veggies finished cooking I tossed it all together.

SUCCESS!  Best tasting General Tso’s yet!  Now that I realize just how much sweetener goes into it, I think that I will have to play around to make it more savory and less sweet just for health’s sake.  But for wow factor, this is the way to go.  😀

For comparison, here is the ingredients list from Iron Chef’s General Tso’s Sauce:  Sugar, soy sauce, water, vinegar, food starch, tomato paste, fresh garlic, dried garlic, red peppers, soybean oil, dried minced onion.

I made some substitutions and added some minced ginger.  I made a triple batch of this for my crew (and the teens were circling the empty serving dishes whining wishing for more.)  That’s why the measurements sometimes seem a bit odd.  It’s tough to split 1/2 tsp. into thirds!  Just for the sake of those of you who like to make large batches as I do, I’ll put the large batch’s measurements in parentheses after each ingredient.

General Tso’s Sauce

  • 1/4 c. evaporated cane juice crystals (or sugar) (3/4 c.)
  • 1-1 1/2 tsp. honey (1/4 c.)
  • 1/4 c. Bragg’s Liquid Aminos (3/4 c.)
  • 1/4 c. + 2-3 T. water (1 1/4 c.)
  • 1 T. fresh organic lemon juice (3 T. – 1 small lemon)
  • 2 tsp. cornstarch (2 T.)
  • 4 tsp. organic tomato paste (4 T.)
  • 2 cloves fresh garlic, minced (6 cloves; 4 T.)
  • 1/4 tsp. garlic powder (3/4 tsp.)
  • 1/8 tsp. (rounded measure) dried red pepper flakes (1/2 tsp.)
  • 1/4-1/2 tsp. toasted sesame oil (1 tsp.)
  • 1/4 tsp. dried minced onion (3/4 tsp.)
  • scant 1 tsp. fresh ginger, minced (scant 1 T.)

Measure 2-3 T. water, mix in the cornstarch, and set it aside.  Place all other ingredients in a saucepan (making sure the tomato paste is thoroughly “dissolved”) and heat to just boiling.  Add the cornstarch mixture, stirring constantly until it loses it slightly milky color and begins to thicken.  Remove from heat and set aside until stir fry is complete and ready for sauce.

Makes approximately 1-1 1/4 c. of sauce.

Sun-Dried Tomato Tofu Spread

My husband isn’t a fan of sandwiches.  Actually, there are a number of food things of which he isn’t a fan.  It can make preparing food difficult if I cater to his tastes.  Thankfully, he’s not demanding about it and will quietly eat whatever is set in front of him (unlike my fussy eater…who should know better at almost 15.)  This was his favorite spread of the 3 that I made last week.

That being said, his favorite way of eating it wasn’t on a sandwich!  (No surprise there!)  He put it on top of leftover rice and heated it in the microwave.  Then after tasting it he said something about ketchup….*gasp!*  (I’m telling you, having a non-taster destroy finely-tuned “gourmet” dishes can do something to your psyche!  lol) I couldn’t bear it.  I said, “Here, give it to me.”  And disappeared into the kitchen.  There was half a jar of pizza sauce and some vegan mozzarella cheese leftover in the frig.  I topped the whole thing artfully with those items and reheated it all in the microwave.  Now you know why it was his favorite of the fillings ~ because it was more like a pizza casserole!  (Actually, it smelled wonderful heated up even before I embellished it.  It probably would make into patties or meatballs, or into a casserole situation very nicely.)

Nevertheless, this does make a marvelous sandwich spread.  I can say this not only because I like it so much, but because my fussy eater loved it ~ even though it does have sun-dried tomatoes in it!

If you use organic ingredients (as in any recipe), the results will be tastier.

Tofu Spread

  • 1/2 c. pecan meal (or very finely chopped pecans – you can do this in the food processor before you chop any of the other moist ingredients)
  • 1/4 of a large onion
  • 1 7-8″ stalk of celery heart, cut into several chunks
  • 14-16 oz. water-packed extra-firm tofu, rinsed and squeezed out some
  • 1/4 c. sliced or diced sun-dried tomatoes ~ oil packed
  • 1 T. extra-virgin olive oil
  • 1 tsp. basil
  • 1/2 tsp. garlic powder
  • 1/4 c. Bragg’s Liquid Aminos
  • 1 T. nutritional yeast

Place pecan meal in a bowl.  Finely chop onion and celery in food processor.  Place in the bowl with the pecan meal.

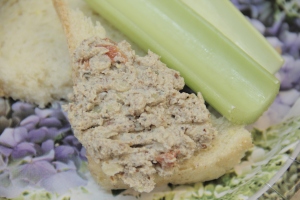
Process remaining ingredients until sun-dried tomatoes are mostly in small pieces and tofu is not smooth, but evenly textured and well mixed with everything else.  (See picture.)  Scrape out into the bowl with pecan meal, onion, and celery.  Stir everything is evenly combined.  Chill for an hour or so to meld flavors.